
Configure Messaging
Railroads use a variety of messaging technologies. This function is used to specify road preferences for messaging. When the user selects Railinc Admin Functions>Messaging>Configure Messaging, the Configure Messaging page is displayed (Exhibit 230).
Exhibit 230. Configure Messaging
Display (Edit) TRAIN II Customers
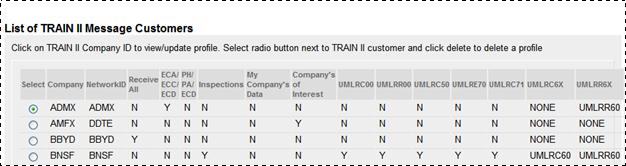
When an existing customer requires changes to their messaging, the administrator Selects the Display TRAIN II Customer link. The List of TRAIN II Message Customers page is displayed (Exhibit 231).
Exhibit 231. List of TRAIN II Message Customers
.
.
.

Scroll to the right to view all message types and settings. To work with a particular customer’s settings, select the radio button beside that customer, and select Edit. The View/Edit TRAIN II Customer Message Settings page is displayed (Exhibit 232).
Exhibit 232. View/Edit TRAIN II Customer Message Settings (top)
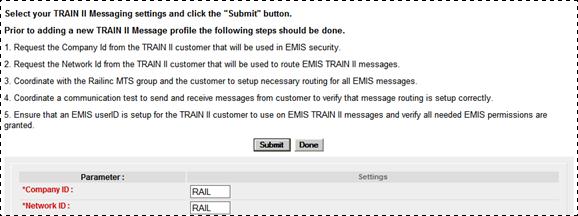
1. Type the Company ID (road mark).
2. Type the company’s network ID.
3. Review and/or change the settings shown in shown in Exhibit 233 and Exhibit 235.
Note: The user is expected to understand the functions of the various TRAIN II messages and whether the company needs to receive those messages. Refer to the TRAIN II User Manual available using the upper right Help link.
Exhibit 233. View/Edit TRAIN II Customer Message Settings (middle)
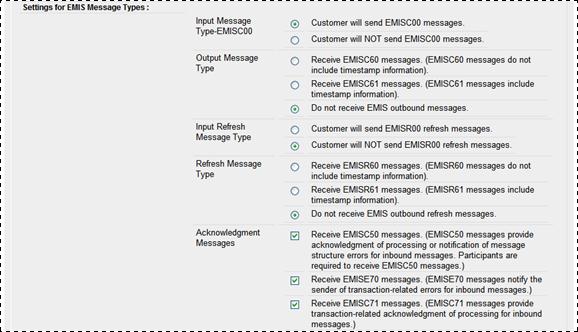
Exhibit 234. View/Edit TRAIN II Customer Message Settings (middle cont’d)
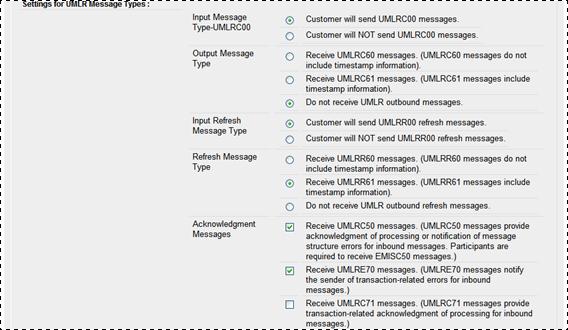
Exhibit 235. View/Edit TRAIN II Customer Message Settings (bottom)
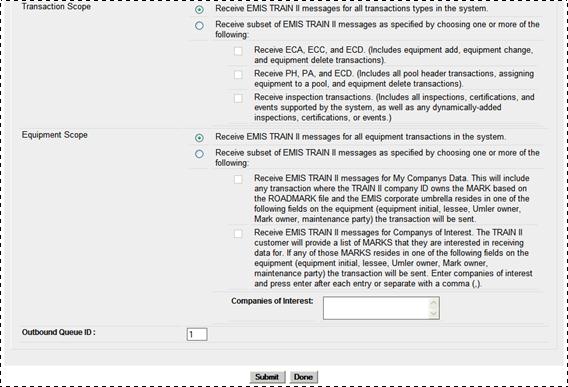
4. Type the marks of any companies of interest following the online instructions.
5. When all settings are acceptable, select Submit. The a message indicates the settings are saved.
6. Select Done to return to the Configure Messaging page, or select another menu option.
Add TRAIN II Customer
When a customer requires TRAIN II messaging, the administrator selects the Add TRAIN II Customer link. The View/Edit TRAIN II Customer Message Settings page is displayed (Exhibit 232).
1. Read the instructions and requirements at the top of the page and obtain the required IDs and permissions before continuing.
2. Type the Company ID (road mark).
3. Type the company’s network ID.
4. Review and/or change the settings shown in Exhibit 233 and Exhibit 235.
5. Type the marks of any companies of interest following the online instructions.
6. When all settings are acceptable, select Submit. The a message indicates the settings are saved.
7. Select Done to return to the Configure Messaging page, or select another menu option.
8. (Optional) Select the Display TRAIN II Customer link and scroll the list (Exhibit 231) to verify the new TRAIN II customer has been added.
![]()
Legal Notices | Terms of Service | Umler Reference Materials
© 2013 Railinc Corp. All rights reserved.