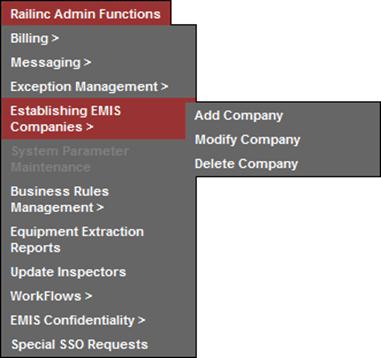
When the user selects Railinc Admin Functions>Establishing EMIS Companies, the Establishing EMIS Companies submenu is displayed. These functions are currently performed by Railinc Umler database administrators. A web interface has been developed for Umler Release 3.3.
Note: The existing Roadmark Register and the Umler system are synchronized once a day.
Exhibit 244. Establishing EMIS Companies Submenu

Exhibit 245 describes the options on the Exception Management submenu.
Exhibit 245. Exception Management Submenu Items and Descriptions
|
Menu Item |
Description |
|
Allows a user to add a new EMIS company to Umler. |
|
|
Allows a user to modify an EMIS company in Umler. |
|
|
Allows a user to delete an EMIS company from Umler. |
WARNING: Before executing these tasks, Railinc Administrators must ensure that all appropriate AAR agreements are signed and fees have been paid for the issuance of a company MARK.
This function allows an authorized user to add a new EMIS company (Agency, Shop, or Umbrella company) to Umler. Companies are automatically added to the Select Company list (Exhibit 249) and various Access Right pages. Umbrella company users have the marks “under” them listed in the Access Rights pages (in the Initials column). The new EMIS companies are also selectable in SSO when requesting access.
To add a company:
1. Select Railinc Admin Functions>Establishing EMIS Companies>Add Company. The Add Company page is displayed (Exhibit 246).
Exhibit 246. Add Company

2. Select the Company Type from the drop-down. Valid values include:

Select Submit. Depending on the Company Type selected, an input page is displayed:
Exhibit 247. Add Company Agency
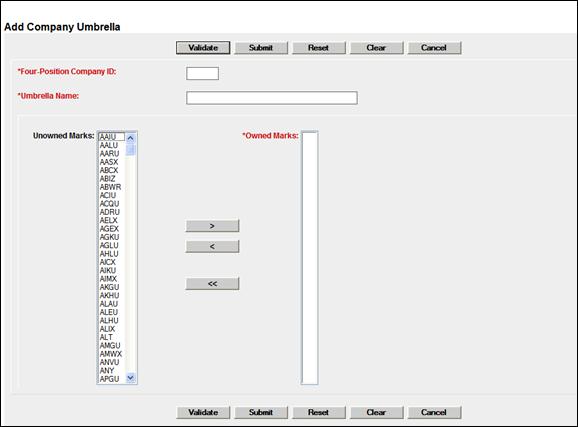
Exhibit 251. Add Company Umbrella
Add Company Agency
Exhibit 247. Add Company Agency

3. Type in the 4-character Agency ID (MARK), the Agency Name, and select Submit. A success message is displayed (Exhibit 248).
Exhibit 248. Add Company Agency (Success)

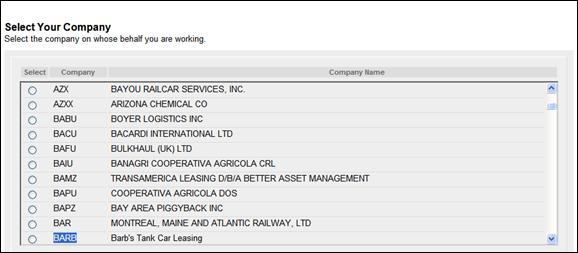
4. Verify the new Agency ID (MARK) appears in the Select Your Company page by selecting the signed-on link. The Select Your Company page is displayed (Exhibit 249). Scroll or find the new name.
Exhibit 249. Select Your Company (with New Agency)

Add Company Shop
Exhibit 250. Add Company Shop

3. Type in the 3-character Shop ID (MARK), the Shop Name, and select Submit. A success message is displayed (similar to Exhibit 248).
4. Verify the new Shop ID (MARK) appears in the Select Your Company page by selecting the signed-on link. The Select Your Company page is displayed (Exhibit 249). Scroll or find the new Shop name.
Add Company Umbrella
An umbrella company is added in the case of railroad mergers, or buy-outs.
Exhibit 251. Add Company Umbrella

3. Type in the 4-character Company ID (MARK) and the Umbrella Name.
4. Highlight the Marks from the Unowned Marks window and select the right arrow to add the marks to the Owned Marks that fall under the umbrella company.
5. Select Submit. A success message is displayed (similar to Exhibit 248).
This function will allow an authorized user to modify an EMIS company in Umler.
To modify a company:
1. Select Railinc Admin Functions>Establishing EMIS Companies>Modify Company. The Modify Company page is displayed (Exhibit 252).
Exhibit 252. Modify Company

2. Type in the Company ID (MARK) and select Next. Depending on what type of company, the appropriate Modify page is displayed (Exhibit 253 or similar to Exhibit 250 and Exhibit 251).
Exhibit 253. Modify Company Agency

The ID cannot be changed on any of these pages, but the other entries can be modified (notably spelling errors, company name changes, or changes in the Marks under the umbrella.
For Umbrella company changes, use the right arrow to add selected marks to the umbrella, or use the left arrow to remove selected marks from the umbrella. Use the double left arrow to remove all marks from the umbrella.
3. When all changes are completed, select Submit. A modification success message is displayed (similar to Exhibit 248).
This function allows an authorized user to delete an EMIS company from Umler.
To delete a company:
1. Select Railinc Admin Functions>Establishing EMIS Companies>Delete Company. The Delete Company page is displayed (Exhibit 254).
Exhibit 254. Delete Company

2. Type in the Company ID and select Delete. A confirm delete panel is displayed (Exhibit 255).
Exhibit 255. Confirm Delete

3. If unsure about the deletion, select Cancel. Otherwise select OK to delete the company. A success message is displayed (Exhibit 256).
Exhibit 256. Delete Company (Success message)

5. Verify the ID (MARK) has been removed from the Select Your Company page by selecting the signed-on link. A “find” for the deleted name should not find it.