Administer Access Rights Involving Other Companies
An administrator grants access rights—to equipment, inspections, and pools, as well as access to confidential data controlled by his/her company (grantor)—to another company (grantee).
The grantor’s administrator selects a grantee (by company) from the list of EMIS-participating companies. The administrator updates the grantee’s access rights to the grantor’s data. The grantor’s administrator can grant new access rights to the grantee or revoke any of the grantee’s existing access rights.
A “handshake” between companies is required for Inter-Company access rights. A grantee must accept a grant before it becomes effective.
The following actions pertain to access rights involving other companies:
· Manage Inter-Company Right/Profiles Granted by My Company—Company Administrators only
· Manage Inter-Company Access Rights Granted to My Company—Company Administrators only
· Manage Inter-Company Profiles Granted to My Company—Company Administrators only
· Special SSO Security Request for Non-participating Companies—Company Administrators only
· View Status of Special Umler SSO Requests—Company Administrators only
Manage Inter-Company Right/Profiles Granted by My Company
This function allows a grantor administrator to grant access rights for equipment, inspections, and pools controlled by his/her company as well as access to confidential data. To work with access rights granted to other companies:
1. On the Security Management page (Exhibit 287), select Manage Inter-Company Right/Profiles Granted by My Company. The Inter-Company Right/Profiles Granted by My Company page is displayed (Exhibit 310).
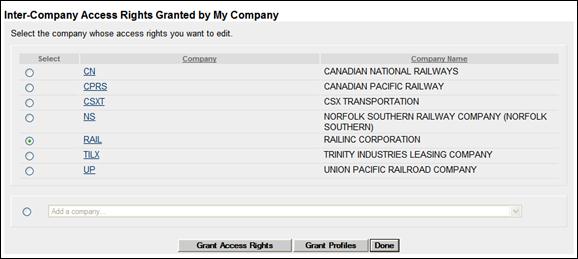
Exhibit 310. Inter-Company Right/Profiles Granted by My Company
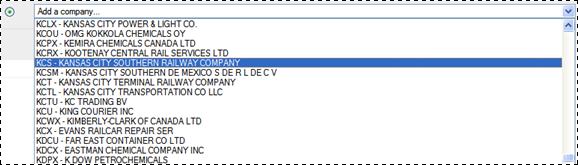
This page shows existing rights by Company. If a new company is to be added, select the radio button beside the Add a company drop-down. The drop-down becomes active (Exhibit 311). Locate the company and select. The drop-down closes with the selection showing.
Exhibit 311. Add a company
2. Otherwise, select the radio button beside the existing company listed whose access is to be added to or revised.
3. Choose one of the following options:
Grant Access Rights—Opens the Update Access Rights page for the selected company (Exhibit 312).
Grant Profiles—Opens the Manage Security Profiles page for the selected company
(Exhibit 315).
When the administrator selects a grantee, and selects Grant Access Rights on the Inter-Company Right/Profiles Granted by My Company page, the Update Access Rights page is displayed.
Exhibit 312. Update Access Rights
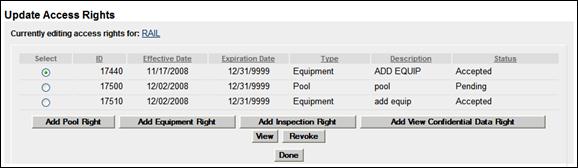
All existing rights for the selected company are shown. Access right can have the statuses shown in Exhibit 313.
Exhibit 313. Access Rights Status
|
Status |
Description |
|
Accepted |
|
|
Declined |
|
|
Expired |
|
|
Pending |
Access granted by administrator’s company, but not accepted or declined currently. |
|
Relinquished |
|
|
Revoked |
Actions allowed on this page include:
Add Pool Right—Opens the Pool Access Right page (similar to Exhibit 292). Refer to Add Pool Right. The new pool right might include the grantee’s mark as part of the description.
Add Equipment Right—Opens the Add Equipment Right page (similar to Exhibit 294). Refer to Add Equipment Right. The new equipment right might include the grantee’s mark as part of the description.
Add Inspection Right—Opens the Inspection Access Right page (similar to Exhibit 297). Refer to Add Inspection Right. The new inspection right might include the grantee’s mark as part of the description.
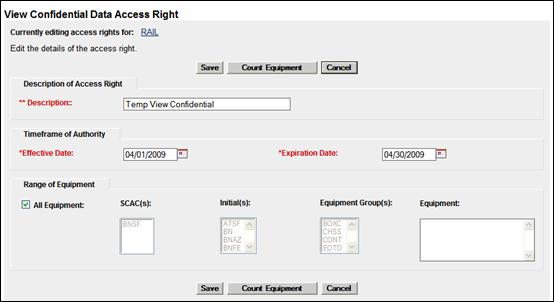
Add View Confidential Data Right—Opens the View Confidential Data Access Right page (Exhibit 314). Refer to Add Equipment Right for instructions. The new confidential equipment right might include the grantee’s mark as part of the description. A limited Timeframe of Authority can be imposed as well.
Exhibit 314. View Confidential Data Access Right
View—Select the radio button beside the grantee access to be viewed and select View. A read-only page (similar to Exhibit 289) opens. When finished viewing, select Done to return to the Update Access Rights page.
Revoke—Select the radio button beside the grantee access to be revoked and select Revoke. A confirmation page is displayed. If unsure about revoking the rights, select Cancel. Otherwise, select Revoke. The Update Access Rights page is redisplayed with the access right status shown as revoked.
Done—Returns User to the Inter-Company Right/Profiles Granted by My Company page (Exhibit 310).
When the administrator selects a grantee, and selects Grant Profiles on the Inter-Company Right/Profiles Granted by My Company page, the Manage Security Profiles page is displayed (Exhibit 315).
Exhibit 315. Manage Security Profiles

Note: If no security profiles (groups of rights) have been established with this company previously, the list shown is empty (no profiles).
The grantor administrator can do the following tasks:
Security Profile ID link—For Pending profiles, selecting the Security Profile ID link opens the Edit Security Profile page (similar to Exhibit 305). Refer to Editing a Security Profile. No “User” section is included when editing profiles for other companies, since the user population is unknown. Modification of the various rights and dates are the same.
Add—Add a new security profile for the grantee company. The Add Security Profile page is displayed (similar to Exhibit 303). The Security Profile Name should include the grantor’s Mark, since, once accepted by the grantee, the profile is included in the profiles available for assigning to grantee users. Refer to Adding a New Security Profile. No “User” section is included when creating profiles for other companies, since the user population is unknown. Assignment of the various rights and dates are the same.
Revoke—Check the box beside the profile to be revoked and select Revoke. There is NO warning prior to the revocation, and the status changes to revoked.
Select Done to return to the Security Management page.
Manage Inter-Company Access Rights Granted to My Company
This functions allows the grantee administrator to accept, decline, relinquish, and assign users to access rights granted by other companies. To work with access rights granted by other companies:
1. On the Security Management page (Exhibit 287), select Manage Inter-Company Access Rights Granted to My Company. The Inter-Company Access Rights Granted to My Company page is displayed (Exhibit 316).
Exhibit 316. Inter-Company Access Rights Granted to My Company
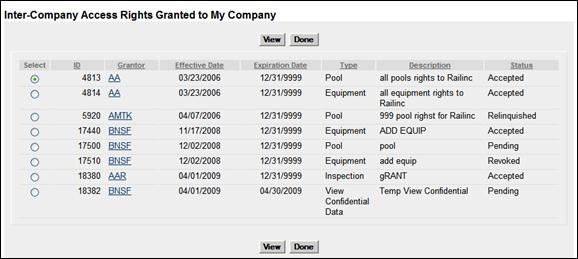
The status of each access right is described in Exhibit 313.
2. To view an access right, select the radio button beside the desired access and select View. The View <Type> Access Right page is displayed (Exhibit 317). The title of the View page reflects the type of access granted (Pool, Equipment, Inspection, or Confidential Data).
Exhibit 317. View <Type> Access Right
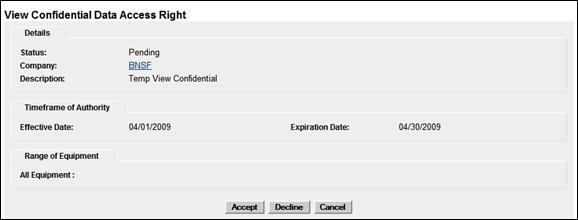
Depending on the type of access granted and its status, available actions vary.
Exhibit 318. Status-Based Actions for View
|
|
Actions Available |
|||||
|
Status |
Accept |
Assign |
Assign |
Decline |
Done |
Relinquish |
|
Accepted |
|
ü |
ü |
|
ü |
ü |
|
Declined |
|
|
|
|
ü |
|
|
Expired |
|
|
|
|
ü |
|
|
Pending |
ü |
|
|
ü |
|
|
|
Relinquished |
|
|
|
|
ü |
|
|
Revoked |
|
|
|
|
ü |
|
Accept—Accept the grantor’s Pending access right. The status changes to Accepted and new actions are available (see Exhibit 318).
Decline—Declines the grantor’s Pending access right. The status changes to Declined and No further actions are available (see Exhibit 318).
Assign to User—For Accepted access rights, opens the Intra-Company User List (Exhibit 319). See Assign to User. Only one user can be assigned at a time. If multiple users need this right, the administrator may choose to assign to a profile instead.
Assign to Profile—Allows the administrator to “add” an Accepted access right to an existing security profile. Opens the Manage Security Profiles page (Exhibit 302). See Assign to Profile.
Relinquish—Allows the administrator to surrender an Accepted access right. The status becomes Relinquished and new actions are available (see Exhibit 318).
When the administrator views an accepted access right and selects Assign to User, the Intra-Company User List is displayed (Exhibit 319).
Exhibit 319. Intra-Company User List

.
.
.
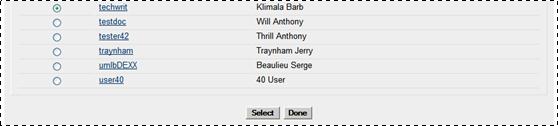
1. Scroll and select the radio button beside the desired user. Scroll to the bottom of the page (press End) and select Select. The View <Type> Access Right page is displayed with the selected user identified under the page title (Exhibit 320).
Exhibit 320. View <Type> Access Right (during user assignment)
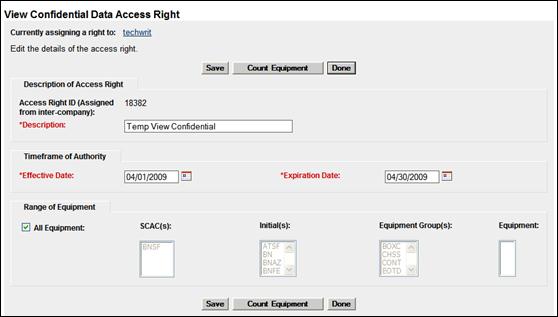
2. Adjust the allowable timeframe if the grantor’s Effective Date begins before the current date.
3. To assign the right to the user, select Save. The View <Type> Access Right page is redisplayed with a success message.
If an accepted right is needed by several users, the administrator can choose to “add” the right to an existing company security profile. The access right would then apply to all users of the profile. When the administrator views an accepted access right and selects Assign to Profile, the Intra-Company Security Profile List page is displayed (Exhibit 321).
Exhibit 321. Intra-Company Security Profile List
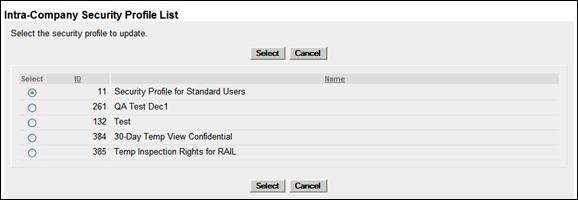
1. Select radio button beside the security profile where the grantor right is to be added, and select Select. The <Type> Access Right page is displayed (Exhibit 322). The ID of the security profile that is being added to is identified under the page title. In Exhibit 322, the security profile ID is 11.
Exhibit 322. <Type> Access Right
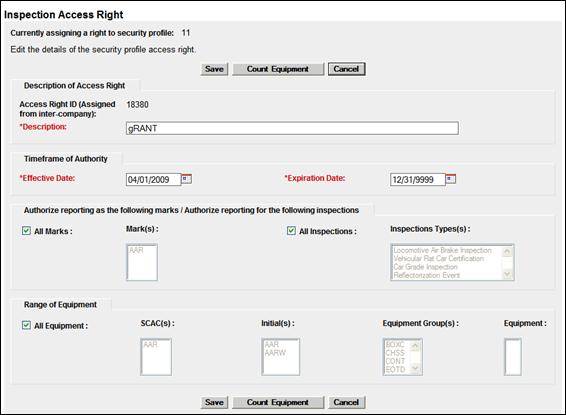
2. Adjust the allowable timeframe if the grantor’s Effective Date begins before today.
3. To assign the right to the profile select Save. The <Type> Access Right page is redisplayed with a success message.
4. Use the Intra-Company Manage Security Profiles function to add multiple user to the adjusted security profile. See Editing a Security Profile.
Manage Inter-Company Profiles Granted to My Company
This functions allows the grantee administrator to accept, decline, relinquish, and assign users to security management profiles granted by other companies. To access security profiles granted by other companies to the grantee:
1. On the Security Management page (Exhibit 287), select Manage Inter-Company Profiles Granted to My Company. The Manage Security Profiles page is displayed (Exhibit 323).
Exhibit 323. Manage Security Profiles (Inter-Company)
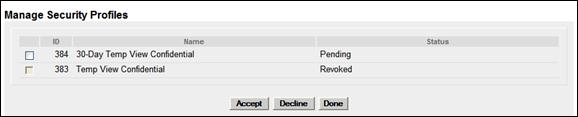
Profiles that are in Pending status can be processed.
2. To decline the profile, check the box beside the profile and select Decline. The status becomes Declined. Nothing more can be done with the profile.
3. To accept the Pending profile, check the box beside the profile and select Accept. The status becomes Accepted, a success message is shown, and the profile ID is a hyperlink.
Note: Umler also lists this inter-company security profile in the Available Profiles on the Add/Remove User to/from Security Profiles page (Exhibit 309). See Add/Remove User to/from Security Profiles for additional instructions.
Exhibit 324. Manage Security Profiles (after acceptance)
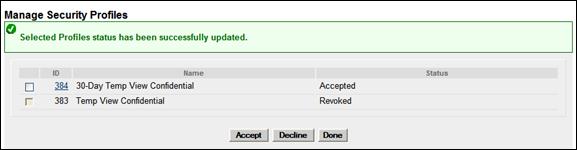
4. To immediately add users, select the profile ID link. The Edit Security Profile page for the inter-company profile is displayed (Exhibit 325).
Exhibit 325. Edit Security Profile (Inter-Company)
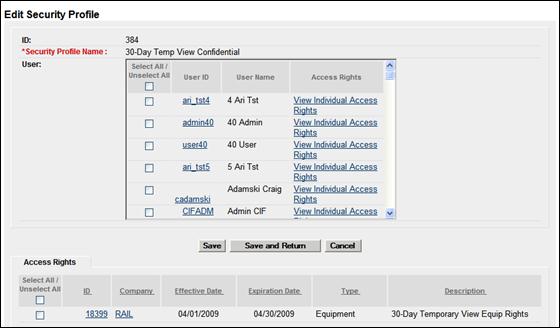
5. Check the box beside the User IDs who need to have the new inter-company profile assigned, and select Save. For more information about Editing Security Profiles, see Editing a Security Profile.
Special SSO Security Request for Non-participating Companies
This function can be used to request full SSO Umler Administrative rights on behalf of another company (hereafter called the Approver). The Approver might be a very small railroad without access to SSO/Umler, and has contracted with an agency or other road (hereafter called the Requestor) to handle its equipment-related tasking. This process serves as a Letter of Authorization (LOA).
To be able to act on behalf of the Approver:
· The Requestor must submit a valid request.
· The Approver must approve the request.
· The Railinc Umler Administrator must verify the request approval in Umler.
· The Railinc Umler Administrator must establish the roadmark authorizations in SSO.
· The Railinc Umler Administrator must implement the approved request in Umler.
· The Requestor (company Admin), must assign a Requestor contact for the Approver marks in FindUs.Rail.
· The Requestor (company Admin), must assign appropriate rights to their Umler users.
These tasks are described elsewhere in this guide (or in the SSO and Launch Pad Administrator Guide). Refer also to FindUs.Rail at https://www.railinc.com/rportal/web/guest/findus. Notification e-mails are sent throughout the process.
1. On the Security Management page (Exhibit 287), select Special SSO Security Request from Non-participating Companies. The Inter Company Authorization Request page is displayed (Exhibit 326).
Exhibit 326. Inter Company Authorization Request
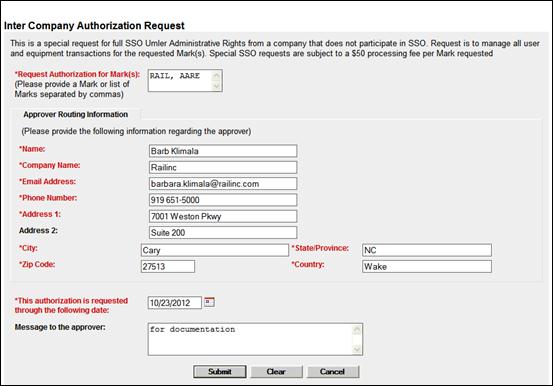
2. Complete the required fields.
a. Request Authorization for Marks—type the marks being requested
b. Name—Type the name of the Approver. (e.g., John n Doe)
c. Company Name—Company Name of Approver (e.g., Very Small Railroad, Inc.)
d. Email Address—Email for Approver (e.g., John.Doe@VerySmallRR.com)
e. Phone Number— Approver’s phone number in AAA XXX-NNNN format
f. Address 1—Mailing address of Approver (Address line 2 as needed)
g. City—City of Approver
h. State/Province—Use 2-character where possible
i. ZIP Code—ZIP code for address
j. Country—Country of Approved (e.g., US)
k. This authorization is requested through the following date—Use calendar picker to choose an end date. For no end date, use 12-31-9999.
l. (optional) Message to the Approver—Appropriate comments (e.g., Let us know if you need other marks handled. )
3. SelectSubmit. A confirmation message is displayed (Exhibit 327)
Exhibit 327. Inter Company Authorization Request Confirmation

a. A confirming e-mail is sent to the requestor.
b. An e-mail is sent to the approver. The approver e-mail contains a link to a website (not shown) where the request can be viewed and then either rejected or approved.
View Status of Special Umler SSO Requests
Once an Intercompany Authorization Request has been submitted, the requestor can check the status of the requests. To check the status:
1. On the Security Management page (Exhibit 287), select View Status of Special Umler SSO Request. The Search Special Umler SSO Requests page is displayed (Exhibit 328).
Exhibit 328. Search Special Umler SSO Requests
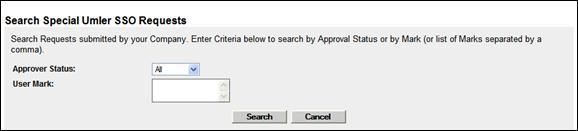
2. Enter search criteria.
a. Approver Status can be:
· All (finds everything, recommended)
· Approved
· Pending
· Rejected
b. User Mark (specific known marks for an Approver)
3. Select Search. The Search Special Umler SSO Requests page is redisplayed (Exhibit 329).
Exhibit 329. Search Special Umler SSO Requests (results)
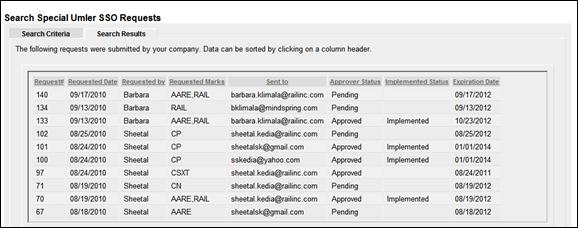
This page is for viewing only. As needed, select the Search Criteria tab to modify the search criteria and do a different search. To exit the page, select another menu item.
![]()
Legal Notices | Terms of Service | Umler Reference Materials
© 2013 Railinc Corp. All rights reserved.