Administer Access Rights Internal to My Company
The following actions pertain to access rights internal to the user’s company.
· View My Access Rights—for all users
· Manage Intra-Company User Access Rights—Company Administrators only
· Manage Security Profiles—Company Administrators only
· Add/Remove User to/from Security Profiles—Company Administrators only
Note: This security management option is available to all Umler users.
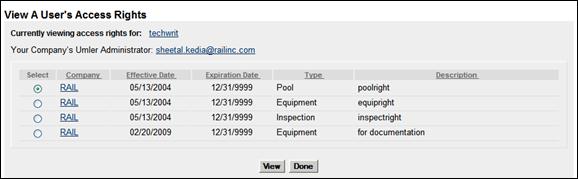
On the Security Management page (Exhibit 287), select View My Access Rights. The View a User’s Access Rights page is displayed (Exhibit 288).
Exhibit 288. View a User’s Access Rights
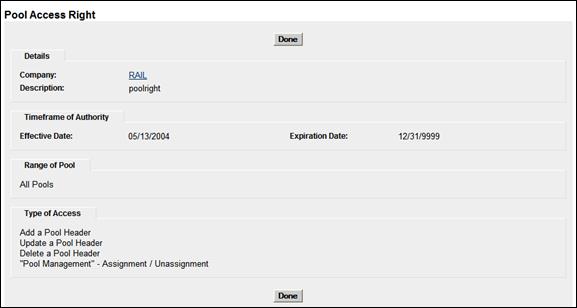
To view the details of a specific access right, select the radio button beside the access and select View. The details of the access are displayed. Exhibit 289 show the access details for the poolright access listed in Exhibit 288.
Exhibit 289. Pool Access Right (view only)
Select the company link to view the Company Contact information page (similar to Exhibit 80).
No other actions are available on this page. When finished viewing, select Done.
Manage Intra-Company User Access Rights
A company Umler administrator can update a user’s access rights. The administrator can grant new access rights, modify existing access rights, delete existing access rights, or copy access rights from another user.
Warning: Before assigning access rights, check the user’s existing rights to ensure rights are not duplicated or contradicted.
To manage user access rights:
1. On the Security Management page (Exhibit 287), select Manage Intra-Company User Access Rights. The Update a User’s Access Rights page is displayed (Exhibit 290).
Exhibit 290. Update a User’s Access Rights
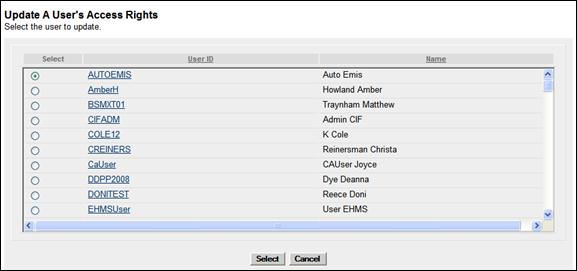
2. Scroll and select the radio button beside the user to be updated. Then select Select. The Update a User’s Access Rights page is redisplayed with the selected user’s access rights (Exhibit 291).
Exhibit 291. Update a User’s Access Rights (for selected user)
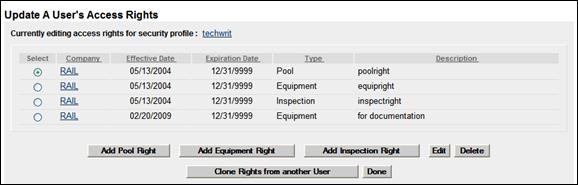
The following actions are possible:
Clone Rights from another User
Use to add pool rights. When Add Pool Right is selected, the Pool Access Right page is displayed for the selected user ID (Exhibit 292).
Exhibit 292. Pool Access Right (for user)
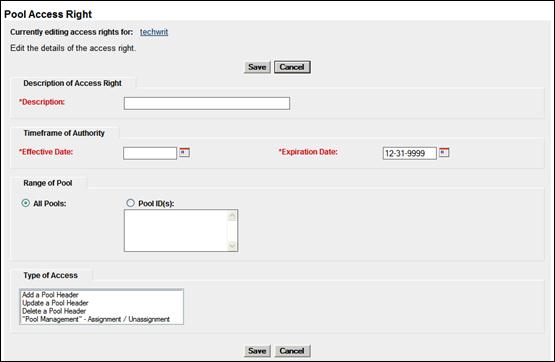
3. Complete the fields (mandatory fields are in red):
Exhibit 293. Pool Access Right Field Descriptions
|
Field |
Description |
|
*Description |
Enter a description of the access rights. It can be simple, like Pool Rights or specific, like BOXC Pools Only, or Hoppers and Gondolas Pool to indicate wider scope. |
|
Timeframe of Authority |
Specify the *Effective Date and the *Expiration Date for the granted pool right. The Effective date defaults to today’s date, and must be greater than or equal to today’s date. The Expiration Date must be greater than or equal to the Effective Date. |
|
Range of Pool |
Select either the All Pools radio button (default) or the Pool ID(s) radio button. For Pool ID(s), enter either specific Pool IDs or a range. |
|
Type of Access |
Select one or more of the available access types (allowed activities) to assign (Press Ctrl key for multiple selections.): · Add a Pool Header · Update a Pool Header · Delete a Pool Header · Pool Assignment / Unassignment |
4. When all fields are completed, select Save. The Update a User’s Access Rights page is redisplayed with the new rights displayed.
Use to add a equipment rights. When Add Equipment Right is selected, the Equipment Access Right page is displayed for the selected user ID (Exhibit 294).
Exhibit 294. Equipment Access Right (for user)
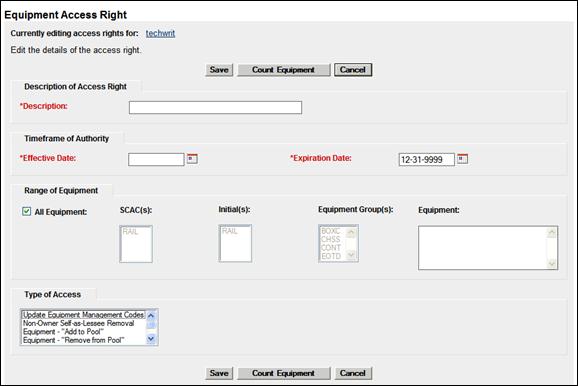
3. Complete the fields (mandatory fields are in *red):
Exhibit 295. Equipment Access Right Field Descriptions
|
Field |
Description |
|
*Description |
Enter a description of the access rights. It can be simple, like Equipment Rights or specific, like BOXC Equip, or Hopper and Gondola Equip to indicate wider scope. For equipment, it might include SCACs in the description. |
|
Timeframe of Authority |
Specify the *Effective Date and the *Expiration Date for the granted equipment right. The Effective date defaults to today’s date, and must be greater than or equal to today’s date. The Expiration Date must be greater than or equal to the Effective Date. |
|
Range of Equipment |
Select either the All Equipment radio button (default) or: · SCAC(s) – Select one or more listed railroad marks. · Initial(s) – Select one or more listed equipment initials. · Equipment Group(s) – Select one or more listed equipment types. · Equipment – Enter specific equipment Marks and numbers (Equipment IDs). Press Ctrl key for multiple selections. |
|
Type of Access |
Select one or more of the available access types (allowed activities) to assign (Press Ctrl key for multiple selections.): · Non-Owner Self-As-Lessee Removal · Equipment - “Add to Pool” · Equipment - “Remove from Pool” · Add Equipment · Modify Equipment · Delete Equipment |
4. (Optional) Select the Count Equipment button to determine the number of equipment units included in the rights assigned.
Exhibit 296. Count for Access Rights
![]()
5. When all fields are completed, select Save. The Update a User’s Access Rights page is redisplayed with the new rights displayed.
Use to add an inspection rights. When Add Inspection Right is selected, the Inspection Access Right page is displayed for the selected user ID (Exhibit 297).
Exhibit 297. Inspection Access Right (for user)
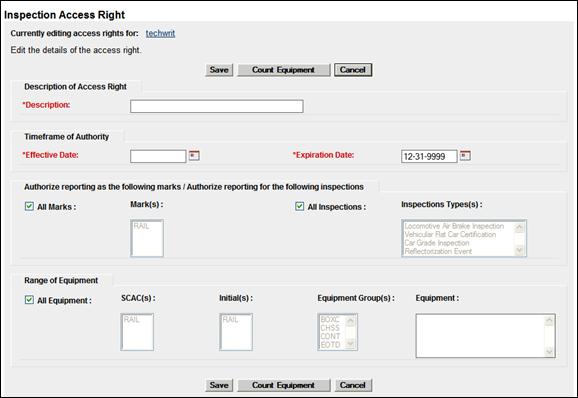
3. Complete the fields (mandatory fields are in *red):
Exhibit 298. Inspection Access Right Field Descriptions
|
Field |
Description |
|
*Description |
Enter a description of the access rights. It can be simple, like Inspection Rights or specific, like BOXC Inspection, or Hopper and Gondola Inspection to indicate wider scope. |
|
Timeframe of Authority |
Specify the *Effective Date and the *Expiration Date for the granted inspection right. The Effective Date defaults to today’s date, and must be greater than or equal to today’s date. The Expiration Date must be greater than or equal to the Effective Date. |
|
Authorize reporting as the following marks |
Use the All Marks check box to (default) select all marks or uncheck this box and select individual listings under the Mark(s) heading. Press Ctrl key for multiple selections. |
|
Authorize reporting for the following inspections |
Use the All Inspections check box to select all inspection types (default) or uncheck this box and select individual listings under the Inspection Type(s) heading (refer to Exhibit 148). Press Ctrl key for multiple selections. |
|
Range of Equipment |
Select either the All Equipment radio button (default) or: · SCAC(s) – Select one or more listed railroad marks. · Initial(s) – Select one or more listed equipment initials. · Equipment Group(s) – Select one or more listed equipment types. · Equipment – Enter specific equipment Marks and numbers (Equipment IDs). Press Ctrl key for multiple selections. |
4. (Optional) Select the Count Equipment button to determine the number of equipment units included in the rights assigned.
5. When all fields are completed, select Save. The Update a User’s Access Rights page is redisplayed with the new rights displayed.
Use to edit or view an existing access right. To edit (or view) user access rights:
1. On the Security Management page (Exhibit 287), select Manage Intra-Company User Access Rights. The Update a User’s Access Rights page is displayed (Exhibit 290).
2. Scroll and select the radio button beside the user to be updated. Then select Select. The Update a User’s Access Rights page is redisplayed with the selected user’s access rights (Exhibit 291).
3. Select the radio button beside the access right to be viewed or edited and select Edit. The <Pool, Equipment, or Inspection> Access Rights page is displayed accordingly. A statement indicates the user ID that is being edited. The page show the existing settings.
Note: If no changes are needed, select Cancel to return to the Update a User’s Access Rights page.
4. Modify the content as described in Update Access rights as described in Edit (Access rights):
5. When all changes have been made:
a. (Optional) Select the Count Equipment button to determine the number of equipment units included in the revised rights assigned. See Exhibit 296.
b. Select Save. The Update a User’s Access Rights page is redisplayed with the revised rights displayed.
Use this option to delete an existing access right. To delete user access rights:
1. On the Security Management page (Exhibit 287), select Manage Intra-Company User Access Rights. The Update a User’s Access Rights page is displayed (Exhibit 290).
2. Scroll and select the radio button beside the user to be updated. Then select Select. The Update a User’s Access Rights page is redisplayed with the selected user’s access rights (Exhibit 291).
3. Select the radio button beside the access right to be deleted and select Delete. The Confirm - Delete an Access Right page is displayed (Exhibit 299).
Exhibit 299. Confirm - Delete an Access Right
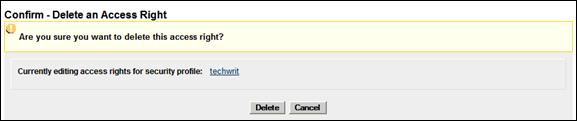
4. If unsure about the deletion select Cancel. Otherwise, select Delete to confirm. The Update a User’s Access Rights page is redisplayed without the deleted access right listed.
Clone Rights from another User
Use this option to clone access rights from another user. To clone rights:
1. On the Security Management page (Exhibit 287), select Manage Intra-Company User Access Rights. The Update a User’s Access Rights page is displayed (Exhibit 290).
2. Scroll and select the radio button beside the user to be updated. Then select Select. The Update a User’s Access Rights page is redisplayed with the selected user’s access rights (Exhibit 291).
3. Select Clone Rights from Another User. The Select Access Right Source page is displayed (Exhibit 300).
Exhibit 300. Select Access Right Source
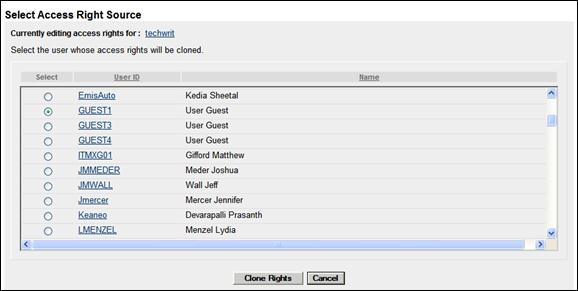
4. Scroll and select the radio button beside the user whose access rights are to be cloned (copied). Then select Clone Rights. The Confirm Clone Access Rights page is displayed with the selected source user’s access rights (Exhibit 301).
Exhibit 301. Confirm Clone Access Rights
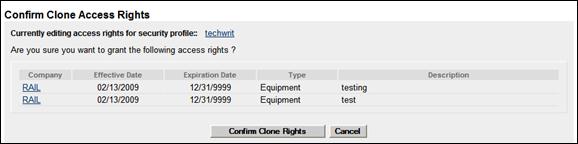
5. If unsure about the rights, select Cancel to exit. Otherwise, select Confirm Clone Rights. The Update a User’s Access Rights page is redisplayed with the new cloned rights. The effective date defaults to the current date.
The manage security profiles option allows a Company Umler Administrator to create security profiles for his/her company. A profile represents a collection of access rights. The Company Umler Administrator can then associate a profile to multiple users in one step, thus simplifying access rights management.
About Combining Pool and Equipment Access Rights
A company administrator can restrict a user activity to certain pools, equipment groups, equipment initials, or equipment units (equipment initial/numbers).
By combining Pool Rights along with Equipment Rights for a user, the administrator can create tighter security around that user’s access rights. For example, the administrator can restrict the equipment groups, equipment initials, or equipment units that a pool operator could assign to a pool.
Example 1:
· User is granted Pool Rights for All Pools.
· User is also granted Equipment Rights for Gondolas only.
Result: The user has rights to all pools but can only assign Gondolas to those pools.
Example 2:
· BNSF User is granted Pool Right for a single specific Pool Id (NNNNNNN).
· BNSF User is also granted Equipment Rights for Equipment Initial ATSF.
Result: The user has rights only to pool NNNNNNN and can only assign Equipment Initials of ATSF to that specific pool.
To work with security profiles:
1. On the Security Management page (Exhibit 287), select Manage Security Profiles. The Manage Security Profiles page is displayed (Exhibit 302).
Exhibit 302. Manage Security Profiles
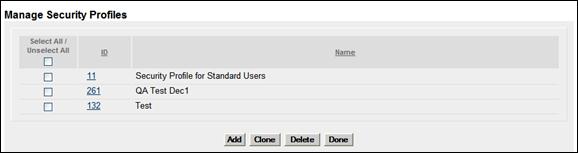
2. Select from the following options:
a. Select Add to add a new security profile. See Adding a New Security Profile.
b. Select the ID hyperlink of a displayed security profile to edit that profile. See Editing a Security Profile.
c. Check the box beside a listed security profile and select Clone to clone an existing security profile. The Administrator should select the closest profile to the new one to be created. See Cloning a Security Profile.
d. Check the box beside a listed security profile and select Delete to delete that profile. See Deleting a Security Profile.
When the user selects Add on the Manage Security Profiles page (Exhibit 302), the Add Security Profile page is displayed (Exhibit 303).
Exhibit 303. Add Security Profile
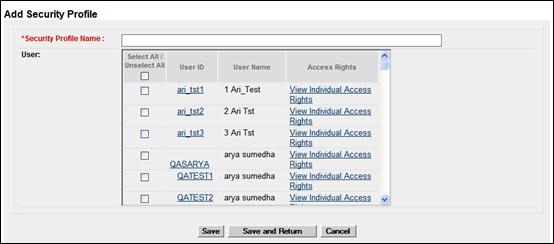
1. Type in the *Security Profile Name. It is suggested that these be role-related and intuitive. For example, Inspectors, Manager Full Rights, or Boxcar Pool Manager, etc.
2. (Optional) Check the box beside those users ID to be the new security profile users. Assignments can be done later during the security profile edit.
a. If needed, select the User ID link to view contact information for that user.
b. Select View Individual Access Rights link to view access rights already assigned to that user.
3. Select Save to save the profile name. The Edit Security Profile page is displayed with a success message and additional buttons (Exhibit 304).
Exhibit 304. Edit Security Profile (for new profile)
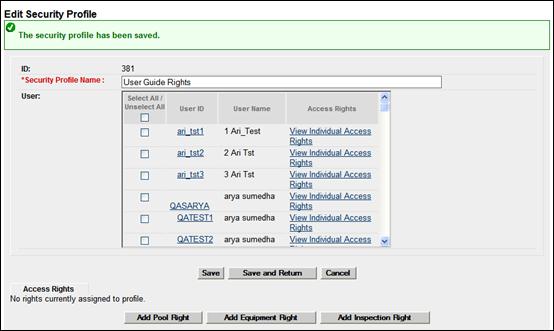
Note: A new profile has no rights assigned. A profile ID is assigned automatically by Umler.
4. Add Pool, Equipment, and Inspection rights and Save as described in:
· Exhibit 293. Pool Access Right Field Descriptions
· Exhibit 295. Equipment Access Right Field Descriptions
· Exhibit 298. Inspection Access Right Field Descriptions
5. (Optional) Check the box beside those user IDs to be the new security profile users. Assignments can be done later during subsequent security profile edits.
6. When all rights and users have been added, select Save and Return to save the created security profile and return to the Manage Security Profiles page. The new profile is listed.
When the user selects a profile ID link on the Manage Security Profiles page (Exhibit 302), the Edit Security Profile page is displayed (Exhibit 305).
Exhibit 305. Edit Security Profile (for existing profile)
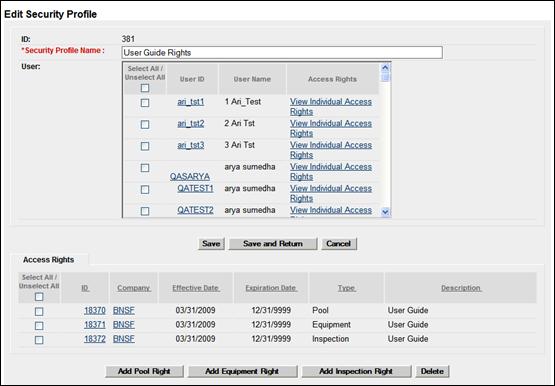
Perform one of the following actions:
Add profile users—Check the box beside the user IDs and select Save to remain on the Edit Security Profile page or Save and Return to save the profile user additions and return to the Manage Security Profiles page.
Delete profile users—Uncheck the box beside the user IDs and select Save to remain on the Edit Security Profile page or Save and Return to save the profile user deletions and return to the Manage Security Profiles screen.
Edit existing access rights—Select the View Individual Access Rights link. The <Pool, Equipment, or Inspection> Access Rights page is displayed accordingly. Modify and Save the content as described in Update Access rights as described in Edit (Access rights).
Add new pool rights, equipment rights, or inspection rights—Select the corresponding command button. Enter rights and Save as described in the following:
· Exhibit 293. Pool Access Right Field Descriptions
· Exhibit 295. Equipment Access Right Field Descriptions
· Exhibit 298. Inspection Access Right Field Descriptions
Delete access rights—Check the box beside the Pool, Equipment, or Inspection Rights to be removed and select Delete. A confirmation page is displayed with a choice to Cancel or Delete.
When the user checks the box beside the profile ID link on the Manage Security Profiles page (Exhibit 302) and selects Clone, the Clone Security Profile page is displayed (Exhibit 306).
Exhibit 306. Clone Security Profile

The unnamed new security profile contains exactly the same rights as its source and also has the same user population. To complete the cloning process:
1. Type the new cloned Security Profile Name.
2. Unselect All users in the User field.
3. (Optional) Check the box beside those users IDs to be the new security profile users. Profile users can be added later during an edit session.
4. Update Access rights as described in Edit (Access rights).
5. When all users and right have been adjusted, select Save. The Manage Security Profiles page is displayed with the new, cloned profile. Umler automatically assigns a Profile ID.
When the user checks the box beside the profile ID link on the Manage Security Profiles page (Exhibit 302) and selects Delete, the Confirm Delete of Security Profile(s) page is displayed (Exhibit 307).
Exhibit 307. Confirm Delete of Security Profile(s)

If unsure about the deletions, select Cancel. Otherwise, select Delete. The Manage Security Profiles page is redisplayed with a success message, and the deleted profiles are not listed.
Add/Remove User to/from Security Profiles
This function allows the administrator to add/remove multiple security profiles for a single user. If more than one user is involved, it can be quicker to edit the security profiles and assign multiple users during the edit session.
To add/remove user to/from security profiles:
1. On the Security Management page (Exhibit 287), select Add/Remove User to/from Security Profiles. The Add/Remove User to/from Security Profiles page is displayed (Exhibit 308).
Exhibit 308. Add/Remove User to/from Security Profiles
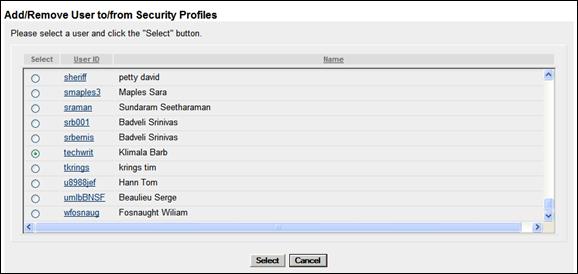
2. Select the radio button beside the user ID to be added or removed as a profile user and select Select. The second Add/Remove User to/from Security Profiles page is displayed (Exhibit 309).
Exhibit 309. Add/Remove User to/from Security Profiles (w/profile Add/Remove windows)
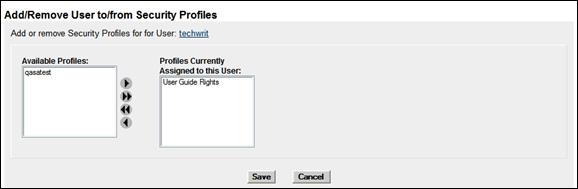
The user being modified is listed below the page title.
3. Add or remove profiles:
a. To add a profile, select/highlight a profile from the Available Profiles window and select the right arrow (![]() ). The selected profile moves to the Profiles Currently Assigned to this User window.
). The selected profile moves to the Profiles Currently Assigned to this User window.
Note: To add all profiles to the user, select the double right arrow (![]() ). No profile selection is necessary.
). No profile selection is necessary.
b. To remove a profile, select/highlight a profile the Profiles Currently Assigned to this User window and select the left arrow (![]() ).
).
Note: To remove all profiles from the user, select the double left arrow (![]() ). No profile selection is necessary.
). No profile selection is necessary.
4. Select Save to save changes and return to the Security Management page. A successful update message is displayed.
![]()
Legal Notices | Terms of Service | Umler Reference Materials
© 2013 Railinc Corp. All rights reserved.