Associate Component
The Associate Component function is used to associate a component registered in Umler with a registered Umler Equipment ID.
Exhibit 59. Component Registry (with Associate Component)
When the user selects Component Registry>Associate Component on an Umler page (Exhibit 59), the Associate Component to Equipment panel is displayed, (Exhibit 60).
Exhibit 60. Associate Component to Equipment
Note: The user must know both the Equipment ID and Component IDs to be associated.
To associate a component with a piece of equipment:
1. Log onto Umler as described in Logging In. The Umler Welcome page is displayed (Exhibit 8).
2. Select Component Registry>Associate Component. The Associate Component to Equipment panel is displayed (Exhibit 60).
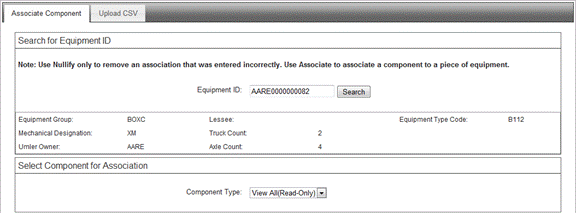
3. Type in the Equipment ID to be associated, and select Search. The Associate Component to Equipment results panel is displayed (Exhibit 61).
Exhibit 61. Associate Component to Equipment (search results)
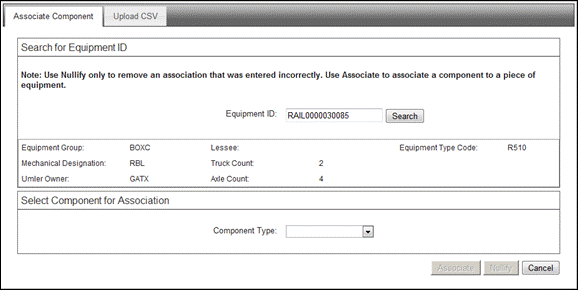
Information about the equipment is provided.
4. Select the Component Type from the drop-down.
a. For Bolsters, go to Bolster Association.
b. For Couplers, go to Coupler Association
c. For Side Frames, go to Side Frame Association.
d. For Wheelsets, go to Wheelset Association.
e. To view ALL components associated with the equipment ID, select View All.
The bottom of the panel has a table with the bolster positions (from the “B” end). In Exhibit 62, the equipment AARE0000000082 has two positions for component association (the "A" end is already populated).
Exhibit 62. Associate Bolster to Equipment (ready for Association)
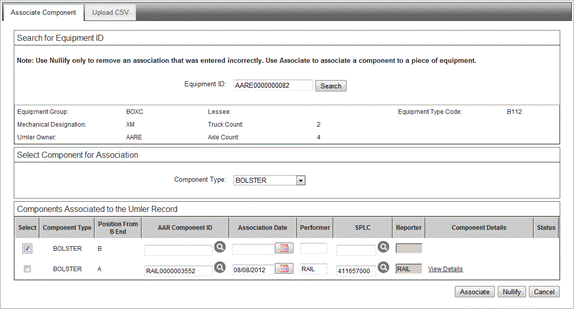
1. Complete the table:
a. Select the checkbox beside the position where the component has been applied.
b. Type the AAR Component ID. If the component ID is unknown, use the lookup icon (![]() ) to open the Component Search panel (Exhibit 63).
) to open the Component Search panel (Exhibit 63).
· Enter information in the three required fields and select Search.
Note: The system can only return the most recent registration for criteria submitted.
Exhibit 63. Component Search (Bolsters)
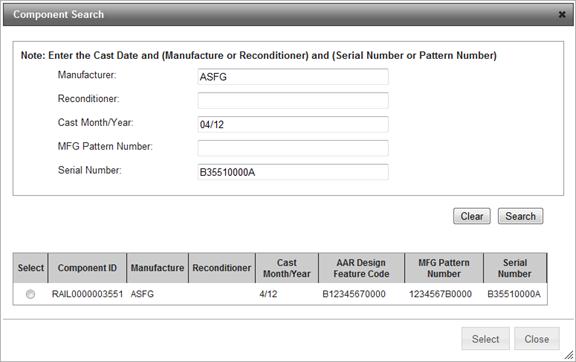
· If a component is found, select the radio button at the left and select Select to close the panel and return to the Association page. The selected Component ID is added to the field.
Note: If no component ID is found, register the component as described in Add New Component, and come back to associate. Recalled components are NOT identified in a search.
c. Use the calendar icon to select the date the component was applied (cannot be in the future).
d. Type the mark of the performer (i.e., shop mark).
e. Use the SPLC icon to search for a SPLC (not shown), or type the known nine-digit SPLC where the application was performed (e.g., shop SPLC).
f. Enter other components table rows as appropriate.
When an entry is complete, the Associate button becomes available.
2. If the table rows are correct, select Associate.
a. If the component has been identified in a recall, a Confirm panel is displayed (Exhibit 64). The Component Details field also shows the component under recall.
Exhibit 64. Confirm Panel for Recalled Component
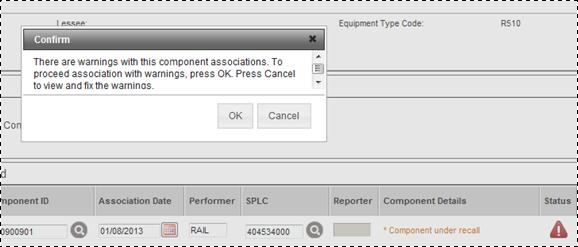
Select Cancel to change to a different component. Otherwise, select OK to install the recalled component.
b. If the component has no warnings, the Associate Component to Equipment panel is redisplayed with a success message (Exhibit 65).
Exhibit 65. Associate Bolster to Equipment (Success Message)

The Reporter field has been populated and the View Details link is available.
3. As needed, to view details of the associated component, select the View Details link. The read-only Component Details panel opens in the center of the page (similar to Exhibit 74).
4. If the component was associated incorrectly, (e.g., wrong Equipment ID, or wrong position on equipment), the association can be nullified. See Nullify an Association.
5. Select Cancel to return to the Associate Component to Equipment search panel, or select another menu item.
The bottom of the panel has a table with the coupler positions (B and A). In Exhibit 66, the equipment RAIL0000000226 has two positions for component association (the "B" end is already completed, but not associated yet).
Exhibit 66. Associate Coupler to Equipment (ready for Association)
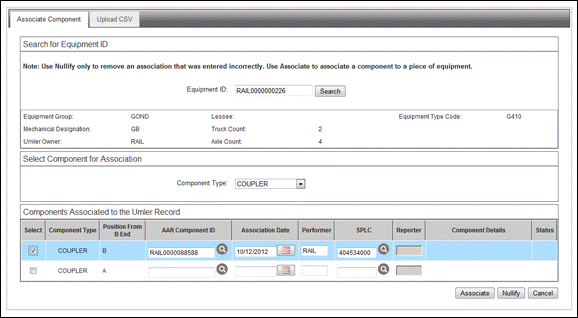
1. Complete the table:
a. Select the checkbox beside the position where the component has been applied.
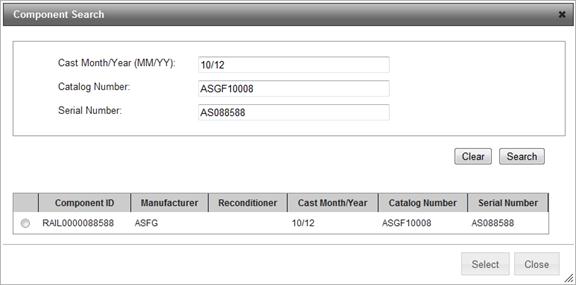
b. Type the AAR Component ID. If the component ID is unknown, use the lookup icon (![]() ) to open the Component Search panel (Exhibit 67).
) to open the Component Search panel (Exhibit 67).
· Enter information in the three required fields and select Search.
Note: The system can only return the most recent registration for criteria submitted.
Exhibit 67. Component Search (Coupler)
· If a component is found, select the radio button at the left and select Select to close the panel and return to the Association page. The selected Component ID is added to the field.
Note: If no component ID is found, register the component as described in Add New Component, and come back to associate. Recalled components are NOT identified in a search.
b. Use the calendar icon to select the date the component was applied (cannot be in the future).
c. Type the mark of the performer (i.e., shop mark).
d. Use the SPLC icon to search for a SPLC (not shown), or type the known nine-digit SPLC where the application was performed (e.g., shop SPLC).
e. Enter other components table rows as appropriate.
When an entry is complete, the Associate button becomes available.
2. If the table rows are correct, select Associate.
a. If the component has been identified in a recall, a Confirm panel is displayed (refer to Exhibit 64). The Component Details field also shows the component under recall.
b. If the component has no warnings, the Associate Component to Equipment panel is redisplayed with a success message (Exhibit 68).
Exhibit 68. Associate Coupler to Equipment (Success Message)
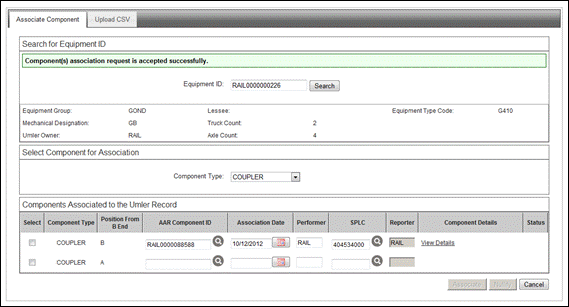
The Reporter field has been populated and the View Details link is available.
3. As needed, to view details of the associated component, select the View Details link. The read-only Component Details panel opens in the center of the page (similar to Exhibit 74).
4. If the component was associated incorrectly, (e.g., wrong Equipment ID, or wrong position on equipment), the association can be nullified. See Nullify an Association.
5. Select Cancel to return to the Associate Component to Equipment search panel, or select another menu item.
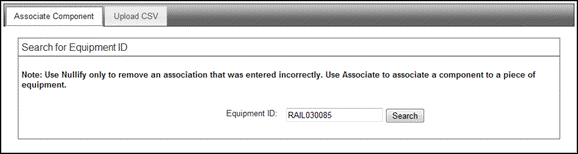
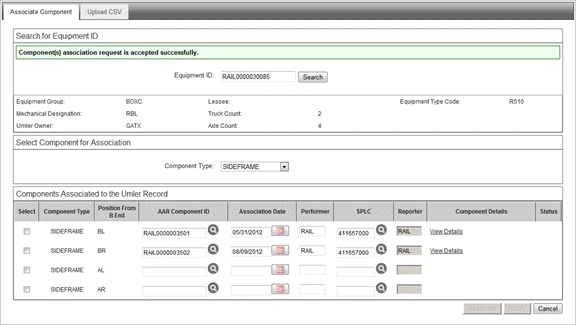
The bottom of the panel has a table with the side frame positions (from the “B” end).
In Exhibit 62, the equipment RAIL0030085 has four positions for component association.
Exhibit 69. Associate Side Frame to Equipment (ready for Association)
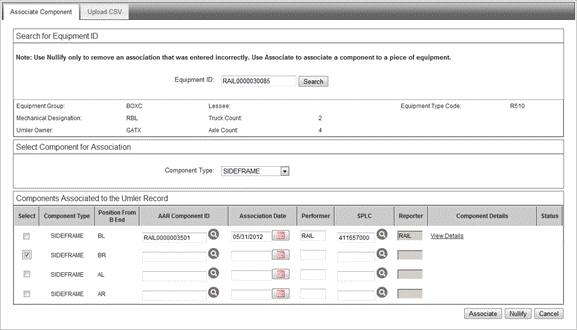
1. Complete the table:
a. Select the checkbox beside the position where the component has been applied.
b. Type the AAR Component ID. If the component ID is unknown, use the lookup icon (![]() ) to open the Component Search panel (similar to Exhibit 63).
) to open the Component Search panel (similar to Exhibit 63).
· Enter information in the three required fields and select Search.
Note: The system can only return the most recent registration for criteria submitted.
· If a component is found, select the radio button at the left and select Select to close the panel and return to the Association page. The selected Component ID is added to the field.
Note: If no component ID is found, register the component as described in Add New Component, and come back to associate. Recalled components are NOT identified in a search.
c. Use the calendar icon to select the date the component was applied (cannot be in the future).
d. Type the mark of the performer (i.e., shop mark).
e. Use the SPLC icon to search for a SPLC (not shown), or type the known nine-digit SPLC where the application was performed (e.g., shop SPLC).
f. Enter other components table rows as appropriate.
When an entry is complete, the Associate button becomes available.
2. If the table is correct, select Associate.
a. If the component has been identified in a recall, a Confirm panel is displayed (refer to Exhibit 64). The Component Details field also shows the component under recall.
b. If the component has no warnings, the Associate Component to Equipment panel is redisplayed with a success message (refer to Exhibit 70).
Exhibit 70. Associate Side Frame to Equipment (Success Message)
The Reporter field has been populated and the View Details link is available.
3. As needed, to view details of the associated component, select the View Details link. The read-only Component Details panel opens in the center of the page (similar to Exhibit 74).
4. If the component was associated incorrectly, (e.g., wrong Equipment ID, or wrong position on equipment), the association can be nullified. See Nullify an Association.
5. Select Cancel to return to the Associate Component to Equipment search panel, or select another menu item.
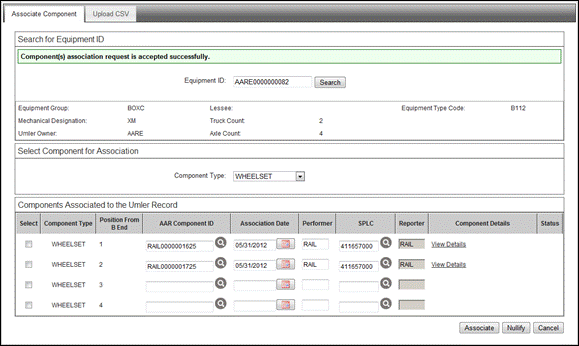
The bottom of the panel has a table with the wheelset positions (from the “B” end). In Exhibit 71, the equipment RAIL000000082 has four positions for component association.
Exhibit 71. Associate Wheelset to Equipment

a. Select the checkbox beside the position where the component has been applied.
b. Type the AAR Component ID. If the component ID is unknown, use the lookup icon (![]() ) to open the Component Search panel (Exhibit 72).
) to open the Component Search panel (Exhibit 72).
· Enter information in both required fields (Wheel Serial Number and Wheel Stamped Manufacturer Code).
· (optional) Enter any of the other available criteria:
– Wheel Stamped Month/Stamped Year
– Wheel Nominal Diameter
– Wheel Design Code
· Select Search.
Exhibit 72. Component Search (Wheelsets)

· If a component is found, select the radio button at the left and select Select to close the panel and return to the Association page. The selected Component ID is added to the field.
Note: If no component ID is found, register a barcoded component as described in Add New Component, or for a nonbarcoded component, add the component as described in Field Registration. Recalled components are NOT identified in a search.
c. Use the calendar icon to select the date the component was applied (cannot be in the future).
d. Type the mark of the performer (i.e., shop mark).
e. Use the SPLC icon to search for a SPLC (not shown), or type the known nine-digit SPLC where the application was performed (e.g., shop SPLC).
f. Enter other components table rows as appropriate.
When an entry is complete, the Associate button becomes available.
2. If the table is correct, select Associate.
a. If the component has been identified in a recall, a Confirm panel is displayed (refer to Exhibit 64). The Component Details field also shows the component under recall.
b. If the component has no warnings, the Associate Component to Equipment panel is redisplayed with a success message (Exhibit 73).
Exhibit 73. Associate Wheelset to Equipment (with success message)
The Reporter field has been populated and the View Details link is available.
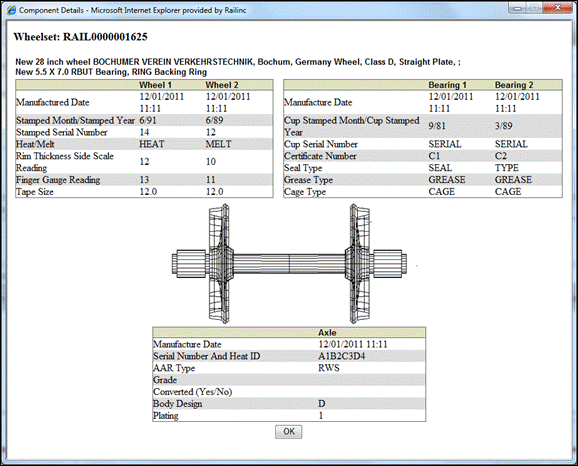
3. As needed, to view details of the associated component, select the View Details link. The read-only Component Details panel opens in the center of the page (Exhibit 74).
Exhibit 74. Component Details (read-only)
4. When finished viewing component details, select OK (or r) to close the panel.
5. If the component was associated incorrectly, (e.g., wrong Equipment ID, or wrong position on equipment), the association can be nullified. See Nullify an Association.
6. Select Cancel to return to the Associate Component to Equipment search panel, or select another menu item.
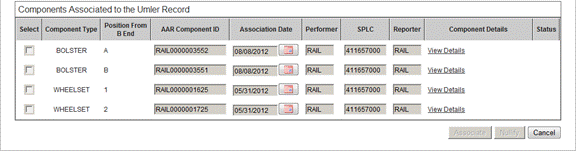
View All (Read Only)
When View All is selected from the Component Type drop-down, all components associated with the equipment ID are shown (Exhibit 75).
Exhibit 75. Associate Component—View All (for Equipment ID)
|
|
Equipment ID AARE000082 has two registered bolsters and two registered wheelsets associated to it. To view the details of a component, select the View Details link at the right (similar to Exhibit 74).
![]()
Legal Notices | Terms of Service | Umler Reference Materials
© 2013 Railinc Corp. All rights reserved.