Add Equipment
The Add Equipment function is used to add new equipment to Umler. This function works well for adding multiple equipment with identical element values. For adding multiple equipment with significant differences or similar to an existing equipment, the Clone Equipment function can save time.
Note: Use only for new equipment. Equipment with a Prior ID must use the Restencil function.
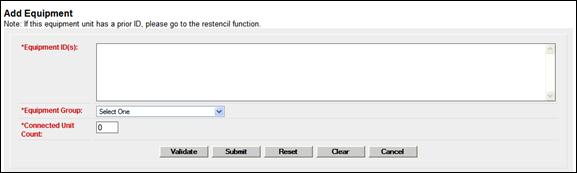
1. Select Maintenance>Add/Change/Delete>Add Equipment. The Add Equipment page is displayed (Exhibit 99).
Exhibit 99. Add Equipment (Initial entry)
2. Type in the Equipment ID to be assigned for this unit.
Note: Each road or private mark may have numbering standards in place. The Equipment ID must follow normal conventions of 2-4 alpha characters and 1-6 numeric characters. For example, BNSF123456. Multiple IDs can be entered at the same time, either on separate lines or separated by commas or a single space. Sequential IDs can be entered as a range (BNSF222201-10).
3. Select the Equipment Group from the drop-down. Valid values are:
Exhibit 100. Equipment Group
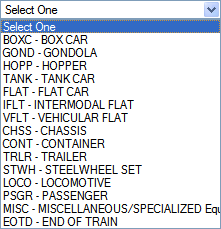
Note: When adding multiple equipment IDs, only one equipment group is used. Some types cannot be changed after entering the new records (e.g., LOCO). If in doubt, add equipment units one at a time. Additionally, the clone function can be used for identical or similar units.
4. For articulated equipment, indicate the number of articulations in the Connected Unit Count field (up to 99). Otherwise, accept the default value of zero.
5. (Optional) Select Validate to have Umler validate the request. Otherwise continue.
6. Select Submit. The system checks to make sure the Equipment IDs entered are not already in Umler (active or inactive).
a. If an active ID exists, the add is not allowed. An error message is displayed.
b. If an inactive ID is found, an information message suggests using Add-Back to reactivate the ID. See Add-Back Equipment.
c. If the requested IDs are valid, the Add Equipment element entry page is displayed.
Exhibit 101. Add Equipment (element entry)
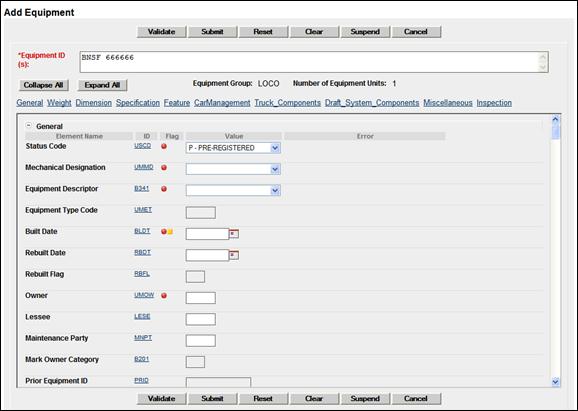
Elements shown in the table are based upon the Equipment Type selection made. Mandatory elements have the red dot in the Flag field (![]() ). See Exhibit 27 for other flag icons.
). See Exhibit 27 for other flag icons.
This page has navigation and display characteristics similar to that described in Display Unit.
7. Complete the fields in the entry page table:
a. Tab between fields.
b. For element field help, select the ID link for the field. See Field Help.
c. For more information about using other web interfaces, see Railinc Interface Elements.
d. Ensure all mandatory fields have been completed.
8. When all input is complete, select Validate. The system validates entries against railroad business rules and acceptable values and displays an error message under the page title and displays any element-specific error message in the error column beside the element.
a. Read through all errors. Because many elements are related, correcting a single element might correct multiple errors.
b. Any error regarding Umler rights (equipment, pool, inspection, or view confidential data) or SSO company-specific rights (authorization to act for a company) must be addressed first. See the Company SSO and/or Umler Administrator.
c. Some conditional elements become mandatory based on inputs (rather than Equipment Type), so complete all new mandatory fields.
d. Use field help to change invalid values. Select the ID link for the field. See Field Help.
e. (Recommended) Correct one error at a time and select Validate between corrections.
10. Select Validate a final time to ensure errors have been corrected.
a. If errors are still found (or new errors initiated), make necessary corrections and revalidate.
Note: If validation fails after several attempts at correction and revalidation, select Suspend to save the work until error corrections can be clearly identified. The Suspend Work page is displayed (Exhibit 102). See Suspended Work to resume the Add Equipment task.
Exhibit 102. Suspend Work

· Write a description that makes it easy to locate the suspended task to resume work. For example, “Add Equipment” might mean one of several add tasks, so the Equipment ID would be helpful.
· Select OK to suspend the task.
b. If no errors are found, a successful validation message is displayed under the page title. Continue with the next step.
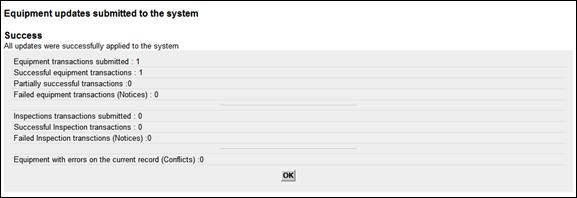
11. Select Submit. The Equipment updates submitted to the system - Success page is displayed (Exhibit 103).
Exhibit 103. Equipment updates submitted to the system - Success
12. Select OK to exit, or select another Umler application menu item (refer to Exhibit 25).
![]()
Legal Notices | Terms of Service | Umler Reference Materials
© 2013 Railinc Corp. All rights reserved.