
Clone Equipment
The Clone Equipment function is used to add single and multiple equipment by cloning from an existing unit.
1. Select Maintenance>Add/Change/Delete>Clone Equipment. The Clone Equipment page is displayed (Exhibit 104).
Exhibit 104. Clone Equipment
2. Type a source equipment ID:
Note: Cloned equipment source can be from any owner/road.
a. Choose a known “matching” Equipment ID from user’s road rolling stock or a known other road’s similar equipment.
b. Perform a search for a unit with the same characteristics. See Equipment Query. Check the Equipment ID search result, open the drop-down at the right, highlight Clone Equipment and select OK to open the Clone Equipment page with the selected record as the source for cloning.
3. Type the new Equipment IDs to be created from the source. See the Note.
4. (Optional) Select Validate to have Umler validate the request. Otherwise continue.
5. Select Submit. The system checks to make sure the Source ID and New Equipment IDs entered are not already in Umler (active or inactive).
a. If an active ID exists, the cloning is not allowed. An error message is displayed.
b. If an inactive ID is found, an information message suggests using Add-Back to reactivate the ID. See Add-Back Equipment.
c. If the requested IDs are valid, the Clone Equipment element entry page is displayed (Exhibit 105).
Exhibit 105. Clone Equipment (pre-populated with source entries)
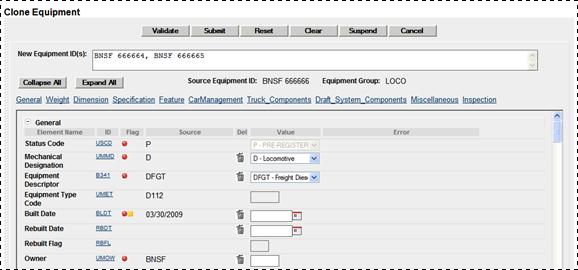
Elements shown in the table are based upon the Equipment Type selection made. Mandatory elements have the red dot in the Flag field (![]() ). See Exhibit 27 for other flag icons.
). See Exhibit 27 for other flag icons.
This page has navigation and display characteristics similar to that described in Display Unit.
Warning: Certain mandatory fields do NOT port over to the cloned records. New inputs are required.
6. Complete the fields in the entry page table:
a. Tab between fields.
b. For element field help, select the ID link for the field. See Field Help.
c. For more information about using other web interfaces, see Railinc Interface Elements.
d. Ensure all mandatory fields have been completed.
7. When all input is done, select Validate. The system validates entries against railroad business rules and acceptable values and displays an error message under the page title and displays any element-specific error message in the error column beside the element.
8. Correct errors and revalidate as described in Step 9.
9. (Optional) Suspend the clone task for later completion as described in the Note.
10. Select Submit to clone the new equipment units. The Equipment updates submitted to the system Success page is displayed (similar to Exhibit 103).
![]()
Legal Notices | Terms of Service | Umler Reference Materials
© 2013 Railinc Corp. All rights reserved.